Sunday, January 30, 2011

Weekend Fun

Ok So first off, I woke up Saturday morning and turned on my desktop PC ... it would not find the hard drive! So I may or may not be able to fix that ... how is this related to the truck? I take the pictures with my digital camera and pull the memory card and transfer them to the PC ... well my laptop does not have a slot for that paticular card, so you are gonna get some grainy, crappy pictures from my iPhone!

Saturday I pulled the traction bars and ground them down to bare metal.I put the bolts in the vinegar jar to soak for a few days. I will probably take them out Monday. I noticed one of the bars had "NATIONAL" embossed on it ... I will have to research to see what part they made if any. EDIT: I searched online and found a midget car parts company National and in their catalog they sell short radius rods. I would say this is what they are made from but I'm not sure. Then I hung them up and painted them with the flat black rust reformer paint.

Traction


Then I dumped out the nuts and bolts for the pressure plate, rear of the drive shaft, shocks and gas tank from the vinegar and tok a small wire brush to make them pretty much like new. I took several pictures with the digital but they wont get posted until I can transfer the pics to my laptop. I also took before pictures of two parts from the traction bars and plan on taking after pics so you can see how well the white vinegar works.
The bolt heads for the rear of the drive shaft and the pressure plate have 'BP" I think ... stamped into them. I will be curious to find out what that stands for.

Drive Shaft Bolts and Retainers

Pressure Plate Bolts

I also sanded the shocks and painted them with the Ford blue engine paint.

Waiting their turn to go back on :O)

Mocked up for the picture

Not too Bad


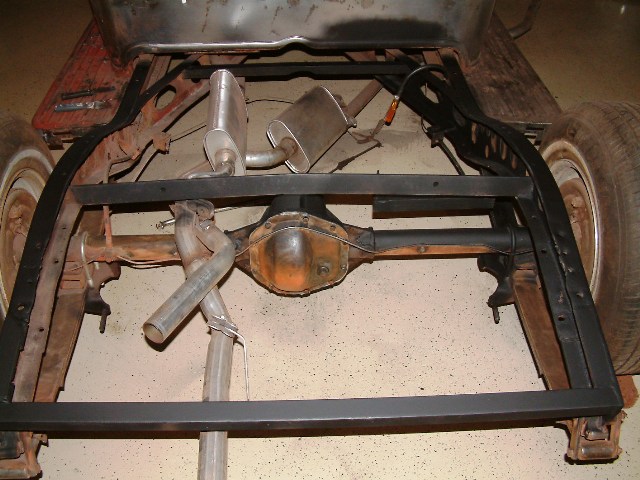
Today I did some more rust removal on the rear and the axles and painted that.


That's a dust smudge on the lower part of the housing


Then I put a little JB weld around the stem on the gas tank for good measure and painted that area. I put the sending unit back in and dumped the vinegar from the tank. I then mounted the tank back on the truck and installed the filler neck. I still need to do some work on the neck, but I did not want the tank to just sit open as I plan on putting gas in it to move the truck once the trans is back in. I stir up a lot of dust while I'm out working as well and I do not want that in the tank.

Tanks back in


Plugged the old return line and got the hose back on


Then I climbed under the truck and cleaned off the area where the oil is leaking from the oil pan and located the area I needed to address. Once I found the area I then took the grinder and wire wheel under with me and got it all cleaned up. For now I used the JB weld to stop the leak and shot some paint on it to hide it all. In the future the plan is to get a good pan of normal capacity and do away with this extended pan.

Can you tell where it was?

I also removed the exhaust the rest of the way out from under the truck. Well at least the one side that was in the way of getting the trans out. I will need all of the room I can get when I go to put the trans back in by myself!


Looking good


I spent the rest of my time cleaning up the mess I had made and getting a few pictures with both cameras so I could at least post something on the blog tonight. I will add/ replace pictures later on.


I am thinking the throw out bearing and pilot bearing will show up tomorrow. I will take some time in the morning to check over the trans for leaks and clean any dirt and oils off the fly wheel.

Friday, January 28, 2011

Paint Fumes

Coated the gas tank with 3m Undercoating top and bottom. Then sanded the primer on the shocks and shot them in Ford blue.

Poured vinegar in the tank and it is soaking overnight
Just like new!


Then I took the thermostat back off ... grrrrr .... and redid the gaskets and this time I put thread sealer on the bolts holding it in. I left the water out of the radiator to make sure the water pump was not leaking or somewhere else and this evening the floor was dry ... well other than an oil spot. (maybe tomorrow)


Man I need to clean the engine up ...DUST

NO WATER BUT LOOK AT THE OIL!


Then I cleaned up the garage and swept the floor followed by a mopping. Then I knocked the rust off of the frame around where the gas tank needs to go back in and shot it with Rust Reformer.


Then I finished cleaning up the top of the differential and shot it with rust reformer. It seems like I'm getting ahead of myself a bit with the paint, but I need to get these areas done so I can get the tank back in so it will be ready to move once I fix the trans. I still have a bit more to do in that area before the tank goes in ... you can see in the pictures some spots where I have not painted yet, like behind the holes in the frame and the backside of the X member.


SWEET


Then I took the traction bars off and will clean and prep them for paint this weekend. I should be getting the throwout bearing and pilot bearing tomorrow or Monday, so that will get priority.

Home made traction bars


Where are all of these nuts and bolts while the parts are off? ... soaking in white vinegar to remove the rust. It works! I will try to remember to get before and after pictures of a rusty part so you can see.

PICKLED  NUTS

I also scraped off the paint where I left stripper on overnight ....

Slow process


More tomorrow ....

Thursday, January 27, 2011

Out of gas ... but plenty of water!

Removed the sending unit from the gas tank. Also removed a rubber hose that someone put on an extra outlet(?) with a bolt in it and filled that in with JB weld. Drained the gas and rinsed out the tank. Used paint remover on the rubber coating then scraped off the excess and finished up with a flapper on the grinder. Painted one side with Rust Reformer. Will do the other side tomorrow and I will pick up some undercoating to top it off. Once it is painted I will pour in some white vinegar to dissolve any rust that may be in there.

Paint is still wet

A few dents but I'm not concerned


I was loosing some water at the thermostat housing so I took that back off to make sure everything was OK in there ... it was not ... I put one of the gaskets on wrong LOL I went ahead and made new gaskets and put it all back together and toped it off with some 50/50 mix antifreeze. I'm still loosing water .... Um, I forgot to put pipe dope or plumber's tape on the bolts that hold the thermostat housing on ... that's gotta be where it's coming from! Grrrrr I will deal with it later.

In between waiting for the paint remover to work on the tank I brushed some on the drivers door and fender. I wanted to get some of that striped while the truck was away from the wall.


After the first scrape

After the first scrape

Wednesday, January 26, 2011

The parts came ...

and of course there were some busted parts.


Damaged box parts came in

Pilot bearing in 4 pieces crease in top of throw out bearing


Dent in throwout bearing

New clutch disc and pressure plate assembly 

Close up of pressure plate assembly
Close up of clutch disc


Spent the day taking the gas tank off and cleaning on the frame and rear end ..

Gas tank removed & waiting it's turn to be striped and painted

Looking ...

Better ...

Every ...

Day ...

My camera picks up rust I can not see LOL ...still a ways to go on this but it will soon get a coat of rust reformer.

I also installed the water pump this AM without any problems. I may add a photo tomorrow. I wont know how things are with that until I start it up and let it run a bit. Probably after the trans is back in.

Tuesday, January 25, 2011

Good things happen'n ....

Started out cleaning and painting the throw out bearing collar and the drive shaft. I just used flat black rust reformer in a spray can.

Refurbished throwout bearing collar SIDE

Refurbished throwout bearing collar BACK

Rust-oleum Rust Reformer

Painted drive shaft waiting to go back in


Then I wire wheeled the shocks and got them in reformer then primer. I still have to sand the primer and shoot the paint .. these are going to be Ford blue. The shocks will get replaced but these are not bad other than cosmetics so I thought I would freshen them up.

Shock before removal

Rusty shock after removal

Shock after wire wheel and reformer
Shocks in primer


Then the water pump showed up! It looks great. I shot a coat of primer on it and painted it back to the silver it was before I sent it off. I also repainted the bolts to flat black. Cleaned up the opening it bolts too but I still have to get the remnants of gasket off. I will probably get it on tonight or tomorrow AM.

New water pump as received from CARDONE

Everything that came with it ...double boxed!
Just sprayed the primer

Drying in front of my heater
First coat of paint

Second coat

160° thermostat (new)

Where the water pump goes