Sunday, October 30, 2011

Somethings Amiss

 The goal today was to get the truck back on the ground and back against the wall out of the way. My plan is to slow down next week and get some much needed stuff done around the house.

So I had to put the radiator back on. Did that and then .........


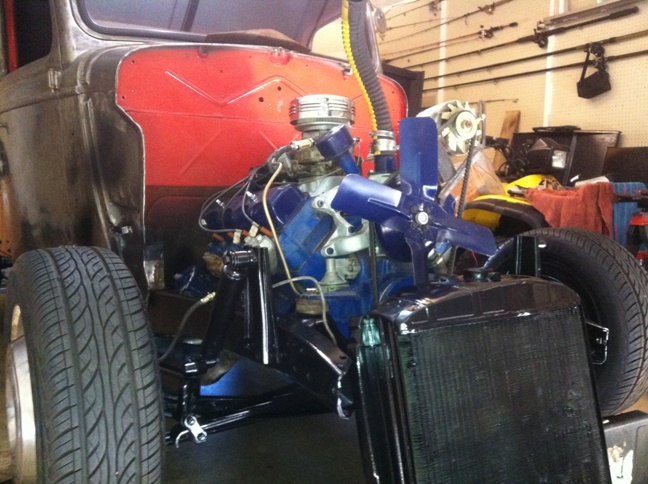
Cleaned up the radiator suport rods and primed then painted them.

Radiator support rods, I was not sure what color they should be so I just went with black for now.


Then I checked the front brake lines to make sure they were tight and then bled the brakes. After than I got the truck back on the ground and hooked up the battery.


Turned the key .... one click then nothing. I must have a wire wrong somewhere. Well just in case I pushed the truck outside and hooked the battery to a charger. I took everything I could out of the garage and cleaned up.

Double checked and the truck still would not turn over so I winched it in with my four wheeler and got everything else back in ... including my GF's car!

It's all piled up but it shouldn't be that way for long! I will try to get small things done and keep posting but my main focus will be on other things next week. I will concentrate on the electrical until I find out what's wrong.

SAD :o(


Saturday, October 29, 2011

Close to wrapping up the wiring!!

    Went out to NAPA this AM to return the dimmer switch and pick up a brake hose .... not. They kid behind the counter could not find a match for my hose  :(  SO I returned home with some connectors and fuses instead.


I nicked this rubber brake hose but it is not leaking. It should be replaced.


Started out finishing up wiring the wires for the headlights that cross over to the passenger side.

Looks good to me!
Still need to bolt down the power block. The wires run under the frame so you can not see them.


Then finished up the wiring under the dash. I still have to decide what I want fused and set that up as well as mounting and hooking up the reducer.

I will tidy this up once I get the fuse box mounted.
Light switch and ignition .. I can see I need to address rust under the dash!
Back to normal!


Put the switches back in.

Painted the knob for the lights with plastic paint. Almond I had at the house for another project.


I also hooked the gas line back up & put the rear wheels back on.


Then I put on a new starter cable, the old one was pretty rough. It should be OK to use as an engine to frame ground.

Starter cable


Finished up bending a new brake line in the front.

The other line was OK it just looked like crap after doing the rest.

Still have to get a turn signal switch and hook these wires up.

Signal wires ready to go!


The truck is wired with new wires and back the way it was when I got it. I still have to mount my fuse box and voltage reducer for the gauges as well as run the single wire for the sending unit for the gas gauge.

Should not take much room under the dash ... now to find 6 circuits to hook to it! FYI The headlights are currently fused via the switch.

Friday, October 28, 2011

Let's drop that voltage!

More on this later ....


I spent a little time this morning running the headlight wires as well as 2 wires for future turn signals.


2 new power blocks ... one on each side. The original had 3 connection points these have 4 with 2 connection points for each. This will make it easy to jump over to the other side for that headlight and signal.


I had went to NAPA and picked up a new dimmer switch, but when I got it home it did not mount correctly so I boxed it back up and it will be returned. I tested the old switch and it appeared to be working properly so I added a jumper wire to the broken spade connection so I could use the middle pin.


Then I replaced the alternator wire with a new one and made it neat. I also purchased a new starter to solenoid cable but have not hooked it up yet.

Man I need to do something with that bracket!


Cleaned up the inside a bit so I will be ready to go at it this weekend and hopefully get the truck back on the ground.


I got tired of putting knots on my head from the running board bracket so I covered it with a sock and shop gloves LOL   Ouch!


Tonight I decided to build the 12 to 6 volt reducer. It came out nice and it works! I used an old heat sink ( aluminum base everything is mounted to)  from a broken PC power supply. This should put out about 10 amps and that should be plenty to run the wiper motor and gauges.


Thursday, October 27, 2011

Half Wired

Now that the frame is painted it was time to get down to the wiring. I tore out the wires running to the back for the tail lights. Then I removed the ignition switch and light switch. Then I disconnected everything from the coil, solenoid and alternator. Made up the new wires and ran it all. I also moved the coil from the fire wall to the engine. I also drilled a hole center of the fire wall but lower than before, for the temperature and oil pressure sensor. Now the fire wall is bare other than some holes that will need attention. When I ran the tail light wires I also ran 2 extra wires for turn signals in the future. I am still trying to decide what I want to use for signals.

Crimped and Soldered
Rear lights junction block
Covered and shrink wrapped
Sweet
Yup
Where the tail light wire goes off to the brake switch.
New end for brake light switch
Brake light switch hooked up.
Wires from taillights tucked away
All cleaned up
The coil has to go too.
Sensors moved down wrapped and a new grommet.
Awesome
Nice and tidy
WOW
Nuff Said LOL


I still need to fix up the ends of all of the wires that ran into the cab so I can connect them to the switches. I should be able to finish that up tomorrow along with connecting the gas line back up. Then the radiator needs to go back on. Also I have to give the headlight wires the same treatment.


Back to reality
Sometimes you have to make a mess to clean it up.

Wednesday, October 26, 2011

Back in Black

    So I went to the auto parts store to see what they had for black paint. They had a glossy premixed quart can of paint for 25 bucks so I decided to look elsewhere. Home Depot was my next stop. Found a quart of glossy black Rustoleum for about 9 Bucks. It was a no brainer .... it is just a frame. I also picked up a can of mineral spirits to thin it.


The can said to thin by adding no more than 5  percent for brushes and rollers but did not mention a sprayer. I had read somewhere 35 (I think) so I went with about 25 percent. I added 8 oz of thinner and it did OK. I think it could have been a bit shinier but maybe this paint doesn't get as shinny as I think. Either way it looks good and now I can get it back together  so I can free up the garage again.


    I had a little time so I went ahead and painted the radiator with a high temp paint.