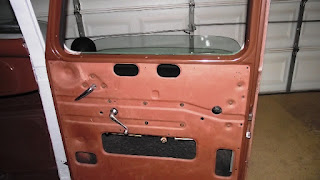
First thing this AM I installed the passenger side regulator and glass. tinkered with it a bit and moved on to the driver's side. If you have never installed one or found my blog looking for instructions I will give you a short run down.
First set the regulator arms in the down position and set it aside and in reach.
Assuming you have the metal bracket installed on the glass insert it in the door from the top and on its side. I put the slanted or front edge in first. You may have to pull out on the inner door skin to allow the knob on the metal bracket to pass by. As you let it down be sure the edges are in the internal rails and slowly start turning it . Once you get it level or close it will be a bit harder to move but not too bad. Let it down to just before the crank hole for the regulator and secure it. You can use a string tied around the glass and tied off to the top of the door or like I did, put the knob on the bottom of the glass behind the remote door latch rod and let it rest on that. Just be sure what ever method you use it is secure so it does not break free and slam to the bottom or on your hand and break something. Also if you do not have your weather felt and channels around the window opening be sure the glass does not flop out. I don't know if that is possible but watch for it. If you have a helper. one could hold the window while the other installs the regulator.
Once secure, go ahead and slip in the regulator and secure it with a few screws. You should firm them up to limit movement of the regulator.
Now you are ready to lower the window down to the channel or rail on the bottom of the window. Put the crank handle on so you can adjust the arms to line up in position to go into the channel on the rail. Once you have them lined up start with the right arm and pull back a bit on the washer while pushing the knob into the slot. You will need to try and do this with one hand as you will need the other to turn the crank so it seats in the channel. Only go in enough to hold the knob in place. This should allow you to do the left arm. You may have to play with a bit to get them both in.
Once in, slowly crank the window up to check for binds, fit etc. Once it is up and you are happy with the position go ahead and install all of the mounting screws. You could have them all in when you first mount the regulator if you like but if you need to take it back out for any reason it will be more work.
Once I had all of my screws tight it changed the way the window went up and down. You will have to loosen and adjust the position of the regulator until your happy with it. This could take some time. Mine are close but I still have some tweeking to do.
On my passenger side, I think my hand made channel is a bit tight so I may have to make a change there. In short the truck now has all new regulators and I can now get the glass up and down or in the case of the windshield, securely closed or open correctly. But I do still have some issues with the side glass working smoothly.
Here are some pictures ....
Note .. all of the felt and rubber cushions were replaced with new. The top flexible felt has not been secured with the screws yet as I will remove it for paint. If I do not paint it for some time I may go head and screw them on.
Here is a shot of one of the rubber cushions installed in the door. there are two in the door and two that go in the garnish.
I suppose I should start on the remaining rear fender soon!
Some extra shots


No comments:
Post a Comment