Today's Blog post is for the HAMB members who may find themselves here because of the "swap" thread I posted today.
If you start with the oldest post you will see everything that has been done to the engine since I have owned it.
In a nutshell:
New gasket set including valve seals.
New distributor cap.
Rebuilt water pump
New pressure plate throw out bearing and clutch.
Engine runs, sounds decent, has blow by.
Oil pan has cut all the way around and welded it back together ( one small leak fixed with JB weld and painted over)
I also have the old pressure plate and clutch if anyone is interested. Pictures in the blog.
You can find my email address in my profile (link on this page) if you have questions/offers.
I am also not opposed to trading the whole project for a solid running/driving streetable mid to early 50's Chevrolet car or truck. Trucks 53 or older. Cars no 4 doors.
It is not my intention or desire to get rid of the 35, so ... to be honest the trade offer must be very appealing to me.
Sunday, February 27, 2011
Friday, February 25, 2011
Here is some video of the truck running after a brief warm up and idle adjustment. I started it a few times before this last video was made .. listen to the first couple of seconds you can here a tapping noise ... did not hear it before. Don't mind the dusty engine LOL
BTW this engine will be for sale .... along with the 3 speed manual transmission. I will post more info later once I figure out a price. Offers welcome.
Wednesday, February 23, 2011
Compression
Checked the compression on the engine
Note: We had 2 gauges ... we used the one with the lower readings.
Cylinder
1- 85lb
3- 60lb
5- 55lb
7- 84lb
2- 79lb

4- 79lb

6- 80lb

8- 85lb

The even side is the side I have been having trouble with oil in the exhaust and has the better readings! Still searching for the right replacement.
Note: We had 2 gauges ... we used the one with the lower readings.
Cylinder
1- 85lb
3- 60lb
5- 55lb
7- 84lb
2- 79lb

4- 79lb

6- 80lb

8- 85lb

The even side is the side I have been having trouble with oil in the exhaust and has the better readings! Still searching for the right replacement.
Sunday, February 20, 2011
And now Sunday!
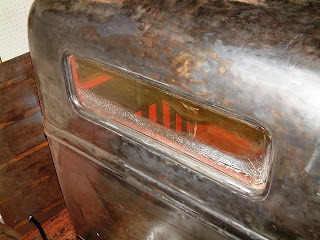
Not much today ... I cleaned up the running board pretty good then finished taking the paint off the hood top and I cleaned up the side of the hood as well. Removed the Ford emblem on that side as well.


I also removed most of the Bondo from the fender ....

The pictures are not great because I moved the truck back against the wall this evening before taking the pictures. Here are some more of the oil leaking from the mufflers .....


I also removed most of the Bondo from the fender ....

The pictures are not great because I moved the truck back against the wall this evening before taking the pictures. Here are some more of the oil leaking from the mufflers .....
 | ||
| From when it was in the driveway |
 | |
|
 |
| After sitting overnight in the garage |
 | |
| Left oil is where the truck sat a few mins. after putting it against the wall. Right is after moving it up a bit and after a few hours. |
Saturday, February 19, 2011
Saturday not Sunday as posted earlier LOL
Started the morning early. The welder came at 830 AM and fixed the shifter mechanism .... not a great job but it works ...so far.

So I installed it back on the truck and did 3 separate adjustments on the clutch .... can get 2,3, and reverse but can not get it to go into first .... I'm not sure whats going on there. I let it run for a while to see how the water was going to act .... nothing major, although I did loose a little out of the overflow after I shut it off. I still don't think it is getting warm enough for the thermostat to open up.
I also noticed that I was still had oil leaking out of the exhaust on the passenger side, where the manifold connects to the exhaust pipe flange as well as back at the muffler inlet. So I took the valve covers off and re torqued the head bolts. While I had access I changed out the broken rocker stud for the new one I picked up from a great guy in Washington a while back. Then I re torqued the intake manifold just to be on the safe side. I don't think any of this helped, but it could be just leaking out what came into the exhaust before I torqued the bolts ... doubt I could be so lucky. I think the rings are bad or I have a busted piston on that side. I'm not going to sink any more money into that engine and trans, it is just too costly and hard to find parts for it. I'll start looking for a good deal on something else. At least I can move it around to work on it now that the shifter is back on.
That was enough frustration for one day so I spent some relax time grinding off more paint! LOL I got the worst of it off the hood top on the drivers side, then moved down to the running board and cleaned that up pretty good. removed a little more from the drivers fender. I am finding a little Bondo but nothing serious yet. I took a little more from the door and cab corner as well.

So I installed it back on the truck and did 3 separate adjustments on the clutch .... can get 2,3, and reverse but can not get it to go into first .... I'm not sure whats going on there. I let it run for a while to see how the water was going to act .... nothing major, although I did loose a little out of the overflow after I shut it off. I still don't think it is getting warm enough for the thermostat to open up.
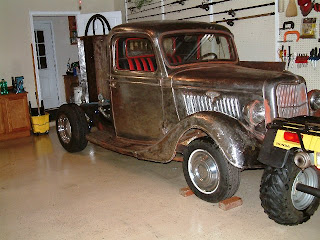
 |
| Dusty! |
I also noticed that I was still had oil leaking out of the exhaust on the passenger side, where the manifold connects to the exhaust pipe flange as well as back at the muffler inlet. So I took the valve covers off and re torqued the head bolts. While I had access I changed out the broken rocker stud for the new one I picked up from a great guy in Washington a while back. Then I re torqued the intake manifold just to be on the safe side. I don't think any of this helped, but it could be just leaking out what came into the exhaust before I torqued the bolts ... doubt I could be so lucky. I think the rings are bad or I have a busted piston on that side. I'm not going to sink any more money into that engine and trans, it is just too costly and hard to find parts for it. I'll start looking for a good deal on something else. At least I can move it around to work on it now that the shifter is back on.
 |
| Oil at manifold |
 |
| Oil at muffler inlet |
That was enough frustration for one day so I spent some relax time grinding off more paint! LOL I got the worst of it off the hood top on the drivers side, then moved down to the running board and cleaned that up pretty good. removed a little more from the drivers fender. I am finding a little Bondo but nothing serious yet. I took a little more from the door and cab corner as well.
 |
| Hood top getting better. |
 |
| Running board and door almost there! |
 |
| Fender still needing attention. |
Friday, February 18, 2011
Thursday - Friday
Updates and pictures coming tonight ... stay tuned.
And here they are :O)
I spent the last two days cleaning rust off the bottom frame parts of the bed and painted those parts with the rust reformer.

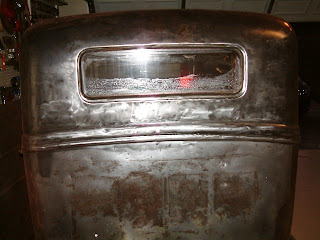
I also finished up the inside frame rail on the truck. And, I knocked off the thin film that had resurfaced on the back/bottom of the cab.

I applied more paint remover to the truck as well .... Almost done with the driver door and started the fender and running board. You can see I still have not finished the hood, but I did work on the side panel on the drivers side. The top of the hood is like pulling teeth trying to get that off so I only do a little at a time before I loose interest and move to another area! Worked on the rear fenders a bit too.


Oh ... this is still not done! You cant rely on people any more.

And here they are :O)
I spent the last two days cleaning rust off the bottom frame parts of the bed and painted those parts with the rust reformer.

I also finished up the inside frame rail on the truck. And, I knocked off the thin film that had resurfaced on the back/bottom of the cab.

I applied more paint remover to the truck as well .... Almost done with the driver door and started the fender and running board. You can see I still have not finished the hood, but I did work on the side panel on the drivers side. The top of the hood is like pulling teeth trying to get that off so I only do a little at a time before I loose interest and move to another area! Worked on the rear fenders a bit too.


Oh ... this is still not done! You cant rely on people any more.

Wednesday, February 16, 2011
Welder tomorrow!
I did not do anything on the truck today .... it was very nice outside so I got some much needed yard work done .....
I did talk to a welder and he will be coming out tomorrow to fix the shifter ... then back to trying to get the clutch adjusted!
I did talk to a welder and he will be coming out tomorrow to fix the shifter ... then back to trying to get the clutch adjusted!
Tuesday, February 15, 2011
Analyzing the Shift Mechanism II
EDIT: Added the measurements to the drawings.
Some drawings of the homemade shift mechanism to allow floor shifting a 3 speed transmission made to be a column shifter (Slang - Three on the tree) ........
.........for you young pups not familiar with old cars this looks like an automatic lever coming out from your steering column that is actually used with a clutch. My transmission (55 Plymouth) came from the factory as a column shift and someone converted it to a floor shift when they put it in my 35 Ford.
I have found after market shifters from various companies for 56 and up but nothing for the 55. So I am going to have to fix the current set up.

The "not so common" feature" of this trans mission is that there is a lever that, while pushing the shift lever to the left it pushes one linkage that sets the transmission up for reverse (left and up) or first (left and down) ....
When the shift lever is not in first or reverse, a spring pulls the linkage for reverse and first back into normal operating position for second (right and up) and third gear (right and down).
[R 2]
\____/
/ \
[1 3]
You can study the pictures above and have a better understanding of how this works.
Some drawings of the homemade shift mechanism to allow floor shifting a 3 speed transmission made to be a column shifter (Slang - Three on the tree) ........
.........for you young pups not familiar with old cars this looks like an automatic lever coming out from your steering column that is actually used with a clutch. My transmission (55 Plymouth) came from the factory as a column shift and someone converted it to a floor shift when they put it in my 35 Ford.
I have found after market shifters from various companies for 56 and up but nothing for the 55. So I am going to have to fix the current set up.
 |
| Click for large picture. |

The "not so common" feature" of this trans mission is that there is a lever that, while pushing the shift lever to the left it pushes one linkage that sets the transmission up for reverse (left and up) or first (left and down) ....
When the shift lever is not in first or reverse, a spring pulls the linkage for reverse and first back into normal operating position for second (right and up) and third gear (right and down).
[R 2]
\____/
/ \
[1 3]
You can study the pictures above and have a better understanding of how this works.
Sunday, February 13, 2011
Sometimes you have to stop and clean.
Spent the first part of the morning removing more paint. Mostly on the top and I also went over the passenger side door and back of the cab again as it was getting a dull film to it .... rust.


I also did a little bit to the driver's door and the rain channel over the passenger side door.


Then I had to stop and clean out the garage! I normally sweep up good and mop on occasion throughout the week, but on the weekends I have to hose it down and sweep the walls, clean the counters etc. If i didn't it would become a disaster pretty quick!

Another week gone by .....


I also did a little bit to the driver's door and the rain channel over the passenger side door.


Then I had to stop and clean out the garage! I normally sweep up good and mop on occasion throughout the week, but on the weekends I have to hose it down and sweep the walls, clean the counters etc. If i didn't it would become a disaster pretty quick!


Another week gone by .....
Saturday, February 12, 2011
Analyzing the shift mechanism
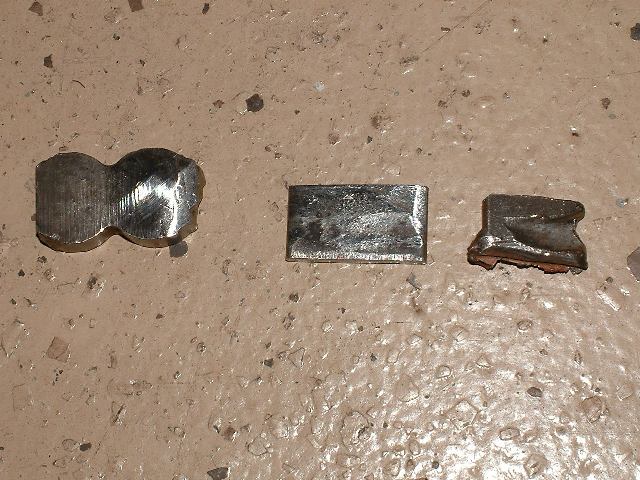
Today I removed the home made shifter from the transmission. Not much to taking it off .... 2 bolts holding the parking brake to the bracket, 2 bolts holding the bracket to the transmission. I nut for the top linkage and one cotter pin for the bottom.


Once I got it off I cleaned up the area that broke and cut a new piece of metal for the piece that wore down over time. I'm not sure everything will be going back the way it was but just in case it does I will have it.


Then I got a few pictures and let the truck back down off of the jack stands and did a little bit more paint removal. Not much time for it ... had an early dinner and decided I was done for the day.


Once I got it off I cleaned up the area that broke and cut a new piece of metal for the piece that wore down over time. I'm not sure everything will be going back the way it was but just in case it does I will have it.

Then I got a few pictures and let the truck back down off of the jack stands and did a little bit more paint removal. Not much time for it ... had an early dinner and decided I was done for the day.


Subscribe to:
Posts (Atom)