Wednesday, February 29, 2012

I've done it now!

    Well nothing bad ... I decided to put new metal in the top of the hood. I cut out an area about a foot square and put in 16 gauge steel. I wanted 18 but they did not have any. It was 16 or 22 .. 22 is too thin.

    I just got it tacked in today ,,, I had to run some errands and mow the grass! This actually worked out OK. I want to take it real slow on this panel to prevent it from warping.


    Here is some shots of of the grill I started the details on yesterday ....


Hopefully I can start making some progress again now that the hood issue should be behind me soon!

Monday, February 27, 2012

Still ....


Well I worked on the hood for a few hours again today. I have to say I don't think I am going to get it right. I finally gave up and put a coat of filler on it. I got it pretty straight but it still has a low spot and a lot of bumps/dings from beating on it. It was a learning experience and I learned I should have left it alone in the first place LOL

    BTW I used several different dollies, files and a home made slapper as well as a ton of shrinking and stretching. The original damage looked like someone sat on the hood and bent it down ... this stretched the metal and it would not just pop out. Once I got it up where it should be it caused warping in other places on the hood. Every time I eliminated one it would create another! I was also getting the metal too hot at times causing it to shrink in too much leaving a depression like hail. Needless to say this side of the hood top is pretty much hosed.

    It will look fine in the end but I will be keeping an eye out for a hood top at a decent price! I may even just cut out the center and weld in a new piece of sheet metal. Hell if welding in the new piece causes shrinkage it will probably pull the stretched original metal back flat LOL

    So tomorrow I will sand it down and probably have to add another coat of two and call it done. I am disappointed that I have to go this route but we do what we have to do to move on ... I'm moving on! What's it been .. a week? Grrrrrr

    I will get some pictures on tomorrow night and hopefully I can start on the grill shell the following day.

Sunday, February 26, 2012

You Guessed it!

Yep I'm still working on the dang hood. I get it real close then another crater develops :(  I think I have it pretty close now but I have some more to go on it tomorrow. I will be glad when I can move on.

I did not take any pictures yesterday or today. It would just be more pictures of the hood and you've seen that so I wont waste your time LOL

Hope to finish up the hood tomorrow and prime. Then I think I will move to the grill and wash up and prime the bed.

Hope everyone had a great weekend!

Wednesday, February 22, 2012

Back to the Hood or ... Hoodsville Daddy-O

    Or, still pounding on the top of the hood.   ;o)~

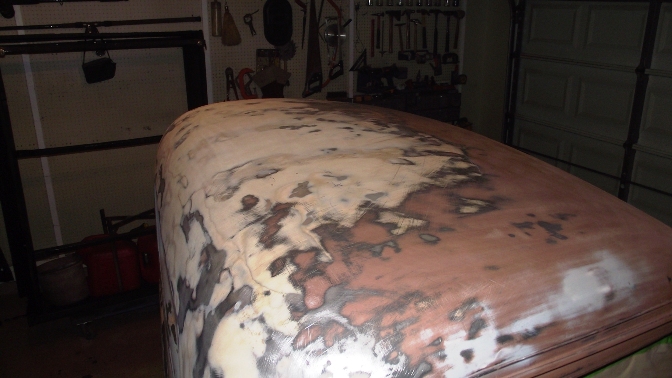
    And that is basically what I did today. Hammer and dolly, stretch heat pound shrink repeat. Oh wait that looks worse than before ... beat pound shrink .... well you get the idea.
   
    I have never work with metal to this extent. It's a great learning experience, but hard as hell ... LOL It seems, in the process of removing a large dent in the hood, I create a bunch of little ones HA
    I am beginning to understand my dollies and the proper way to use them . I am also getting better with using the heat to shrink the metal. When I put the wet rag onto the heat I try to feel the metal pulling down and remove it when it feels flush. If I leave it on too long it can pull down too far causing a depression.

    Now if I can learn to hit the hammer square so I do not leave 1/5th moons all over the surface ... all is not lost, I can use my finishing hammer to gently peck each one flat ... brought that fun on myself!


    I still have the before mentioned moons to deal with and a couple of areas to shrink a bit more and then I should be able to wrap it up ... if not tomorrow then the next day.

  Oh, did I mention ... most of the stuff you see me do in my blog I have never done before!


I did stay at a Holiday Inn Express once! HA

Tuesday, February 21, 2012

Broke Down the Hood

    I went ahead and took the hood back apart so it would be easier to work on. After some more banging on the driver's side of the hood I think I have it where I want it. I went ahead and spread a skim of filler on it to sand down tomorrow.


    A break for lunch!


    Then I moved to the other side. This side was not bad, just a couple dents to smooth. It turned out pretty good ... I should get the hood in primer tomorrow.


    I shot a coat of clear on the steering wheel. I will need to sand this and hit it again, then buff. Sorry crappy picture ... need to charge the batteries for my camera.


    Everything back against the wall so my girlfriend can get her car in :o)


Monday, February 20, 2012

Primer and a Wheel

    Shot the rest of the cab with primer. I also had to mask off the driver's side door jam.


    Took the windshield out and masked that area off and primed.


    Shot the grill too ....

35 Ford Commercial Grill


    Tonight I taped off the steering wheel and shot my imitation chrome :) ...
( I think this is "The Steering Wheel: Day 3") I still have not identified the steering wheel. I have found some that come close but no dice. I also still need to identify the nut that retains it on the shaft. I did some measurements and I think it is a 3/4 - 24 nut that I need. I have tried a 3/4 - 16 and it will not go on. I would think it would at least try to cross thread, but it acts like 3/4 is a hair to small :o(  The hunt continues! I also need to identify it so I can locate a horn button or center cap. What you see there now is just a mason jar lid to keep paint out of the internals.

Unknown steering wheel

Chrome highlights


    The wheel did not turn out as I had hoped but it will work. I will touch up and clear it soon! Hard to see but there is a small chrome strip going around the top of the center piece and extends out towards the wheel on each side coming to a point just before reaching the outer wheel. Then a chrome band on each side. Again, the center is a canning lid LOL


    Now that the cab and grill have been primed I can fine tune the body work. Once I block sand the primer the bad areas will stand out. A little glaze or spot putty and I should be good to go :)

Sunday, February 19, 2012

Masking and Priming

   I masked the truck off this morning with the tape I had left. Then I wiped down the truck with solvent and hit it with a tack rag.


    Then I started shooting the high build primer. This pretty much took the rest of the day and I still have more to do!


Saturday, February 18, 2012

Still Plugging Away!

     I am still working out the cab. I think I have it pretty close now. I will shoot it with high build primer as soon as I get it masked off. I'm out of masking tape so it may get delayed a bit until I can get to the store.


    I also did a little more to the hood and I sanded down the truck with 220 so it would be ready for the high build primer.


    Sometime while putting the electric back in the wire was pulled out of the condenser. It looked to be the original, so I just replaced it.


    I took the blanket off of the seat and got a couple shots of that since I did not take any before without the blanket. The seat looks a lot better than it did the last time it was in. You can still see some bulge on the bottom and about mid way up the back.It still sits 100 percent better than before. It is a lot firmer with the cushions swapped! Now to change out the upholstery!